Showing posts with label ceeceart. Show all posts

Saturday, March 25, 2017

Inspiration from the GREATS! - Henri Rousseau


Welcome to Inspiration from the GREATS!

This month we are being inspired by Henri Rousseau (May 21, 1844 – September 2, 1910) a French post-impressionist painter in the Naïve or Primitive manner. He was a toll collector.  He was self-taught and his work influenced several generations of avant garde artists.

I wasn't quite sure how I was going to do this piece.  I, finally, settled on Prismacolor pencils.  So, here we go..................


Supplies

11" X 15" Canson Watercolor paper
Watercolors
Prismacolor pencils
Graphite pencil for sketching


I would love to see your pieces inspired by Henri.  You can share them on our Inspiration from the GREATS Facebook Group.

Next month our great artist will be Frida Kahlo.

Also, please check out my CeeCeeART Patreon page.  I am doing step-by-step, real time, avideo lessons on projects that are, exclusively, for Patreon.

PEACE!

Cyndi


Tuesday, February 21, 2017

Creative Heart Monday - Uh oh....it's Tuesday!


Happy Creative Heart Monday!

I know, I know.....it's Tuesday.  Things just ran away from me last week.  But, I did finish a quick project today.  Since, I'm completely out of new canvases, I grabbed an old canvas and used acrylic paints and Inktense pencils.  I bought these Inktense pencils awhile back because I always saw people using them and creating beautiful things.  I need to try them more often.

So.......here we go................


Supplies

Canvas
Liquitex White Gesso http://amzn.to/2gzQxjM
Daler Rowney System 3-Neon Pink  http://amzn.to/2j3YoE2
Daler Rowney System 3-Cadmium Red Deep  http://amzn.to/2iVjl77
Derwent Inktense pencils
Prismacolor Black Pen
Black Oil Pastel


Please check out my new CeeCeeART Patreon page.  I'm just getting started this month.  I'm doing some special "real-time" start-to-finish projects just for me Patrons.  Depending upon the level you chose, I'm also giving my patrons handmade cards, prints, etc.

a great Tuesday and a wonderful week.

PEHave ACE!

Cyndi

Monday, October 24, 2016


Happy Creative Heart Monday!

Awhile back, I created a piece called Six Degrees of Separation, based upon a concept that I have always been intrigued with.  Today's piece is, loosely, based on the same thing.

I used acrylic ink and collage.  Here we go..............


Supplies

11" X 14" Bristol Mixed Media Paper
Bombay and FW Acrylic Inks
Tracing Paper
Handcarved rubber stamp
Heart Stamps
Ranger Archival Ink - Black
Black and White Acrylic paint in a Fineline Bottle
Black Charcoal Pencil
Glossy Gel Medium


Have a great Monday and a wonderful week.

Peace!

Cyndi

Monday, October 17, 2016

Creative Heart Monday - Mixed Media Abstract Circles How To


Happy Creative Heart Monday!


I love using lots of supplies.  This is one of those pieces.  I just started playing with paint and ink.....not really sure where I was going.  I had several ideas, then decided......circles it is!!

Here we go.......


Supplies

11" X 14" Canson Bistol Mixed Media paper
Tattered Angels Glimmer Mist
Lindays Stamp Gang Starburst Sprays
Ranger Distress Paint
Ph Marten Bombay Inks
Black acrylic paint in a Fineline Bottle
White acrylic paint in a Fineline Bottle
White Gesso
Gelatos
Miscellaneous decorative paper
Gel Medium
Black charcoal pencil
Faber-Castell Black Pen


For your special friends who love art as much as you do....... Live and Wear ART!!


Have a great Monday and a wonderful week.

PEACE!

Cyndi

Monday, September 19, 2016

Creative Heart Monday - Magical Face


Creative Heart Monday!

I've been working on faces again.  I'm addicted to Christy Sobelewski at the moment.  She has a Patreon account.  I decided to become a patron back in August and I, certainly, have not been disappointed.  She puts up great videos of great projects.  She does a lot of watercolor (which I do not do) so I'm trying it out, as well as, picking up some new ideas for faces.  I just love her faces. Someday, I hope to have my own, distinct, style.....but, right now, I'm taking a little of this....a little of that, from everyone, and trying to change it up a little bit.

Here we go.......


List of Supplies

Graphite Pencil
Magicals by Lindy Stamp Gang
Black Charcoal Pencil
Sakura White Gellyroll Pencil
Prismacolor Pencils


Today is the last day to enter the #ICAlumni Journal Giveaway.  You have the opportunity to win a beautiful, handmade, journal with pages created by 7, different, artists.....and some blank pages for your own work.

Have a great Monday and a wonderful week.

PEACE!!

Cyndi


Saturday, August 13, 2016

Friday, July 29, 2016

Gel Press® and ETI Earrings and More Blog Hop

Welcome to the ETI/Gel Press® Blog Hop.  The designers for both companies have been creating wonderful projects.  Please leave a comment on the Gel Press® blog and on the Resin Crafts blog as to which projects you found most interesting or inspiring.  One winner will be picked, at random, Sunday, July 31, 2016, at 10pm CST.  The winner will get both Petite sets of Gel Press® plates and ETI Jewelry Resin!  Hop now through Sunday! Winner must be 18 or over and live in the USA.  Good Luck!


Gel Press Petites and ETI Resin


I love making jewelry!  I've made a lot of pieces using my Gel Press® prints.

Earrings with Tiny Gems


Gel Press Jewelry


Supplies

Gel Press® prints - I chose similar colors, yet one is lighter.
Square earrings bezels
Tiny gems
Tweezer to pick up gems
Glue

Instructions

1.  Cut two squares to fit earrings

2.  Cut two smaller accent pieces for centers

3.  Dab a bit of glue in center of earring bezel and attach the square Gel Press® prints

4.  Brush a tiny bit of glue on back of accent print and attach to center of each earring

5.  Using tweezers to pick up each gem, dip in a bit of glue then attach to earrings, as desired.

6.  Give the glue 15 minutes to completely dry

7.  Squeeze Resin into cup up to the first line

8.  Squeeze Hardener into the same cup up to the second line

9.  Using the stick that comes in the ETI package, stir mixture thoroughly for 2 minutes, scraping the edges of the cup.  Then pour the mixture into the second cup and stir again.

10. Pour mixture into each earring up to the top.  Be very careful not to create bubbles.  If you do have a few bubbles, pop them immediately.  

11. Set your project aside and allow to completely harden. (at least 24, preferably 48 hours)

ETI looks cloudy when first poured, but it dries crystal clear and very, very hard.  That's what makes it great for jewelry.  However, do not let any of the mixture dry on your table, etc.  You will not be able to get it off!


Bracelet with Gems and Leather Strap

First, I made a Gel Press® print, using pink and purple paint.


Cut the paper to fit the bezel, and stamped the word "HOPE"


Attached the print to the bezel with a little glue. 


I added two tiny gems, filled the bezel with the ETI, using the instructions, above.

Added leather and....voila.....a cute little bracelet!!


Square Ring

I used the same process, except that I glued a black bead to the center of the Gel Press® print, then poured the ETI.


Earrings 
with a little stamping on the Gel Press® prints.


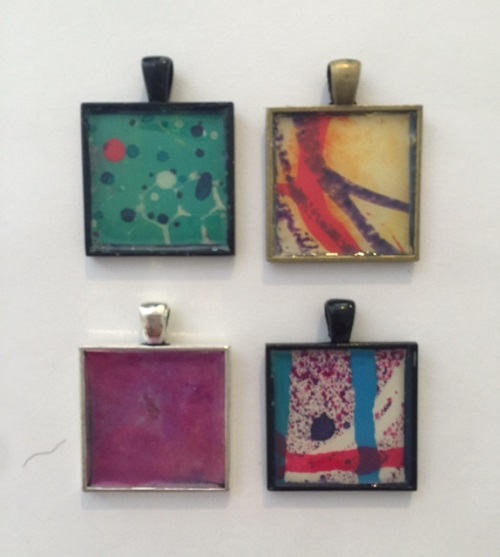
Pendants


And... another ring
this time cutting my prints into thin pieces and gluing them down to create a layered effect.


Watch out....this can become addictive.  I still have more ETI left!!

Now keeping hopping to see more great Gel Press® and ETI projects!


Visit us on Facebook - Gel Press® Junkies, Pinterest, YouTube, Gel Press® Blog

PEACE!!

Cyndi Cesare
Gel Press® Creative Design Team


...