Sunday, August 7, 2016

Creative Heart Monday - Mixed Media Tray DIY How To

\\

Happy Creative Heart Monday!!

Today, we are transforming a plain, thrift store, tray into a mixed media art piece with
Gel Press prints.  If you would like to see the "Gel Press printing" portion of the video in "real time" click here!

Here we go....


Supplies

12" X 14" Gel Press Plate
Glass Bottomed Tray
Canso Bristol Mixed Media Paper
Matte DecouPage
American Paint - Titanium White, Chiffon Blue, Bahama Blue, Peacock Blue
Golden Fluid Acrylics - Ultramarine Blue, Phaylo Turqouis, Green Gold
Liquitex Basics - Mars Black
Stencils
Miscellaneous Mark Making tools
Black Faber-Castell Pitt Pen
Black Charcoal Pencil
Interior Semi-Gloss Paint - Teal
If you would like to see a "real time" version of the printmaking, check out the link
at the bottom of the YouTube video.


Have a great Monday and a wonderful week.

PEACE!!

Cyndi

Monday, August 1, 2016

Creative Heart Monday - Mixed Media Wall Coat Rack


Happy Creative Heart Monday!!

I went to the thrift store last week, looking for canvases, and found this, wall-mounted, coat rack.  The panel popped out, so it was easy to "mixed media" it up a little.


If you would like to see the video in "real time", click here.


Supplies

Coat Rack
Liquitex White Gesso
Book Pages and Ephemera
Matte DecouPage
Golden - Quinacidone Magenta, Teal, Cerulean Blue, Green Gold, Primary Magenta, Permanent Rose, 
Americana - Titanium White, Bahama Blue, Blue Chiffon, Sage Green, Titan Buff, Black
Fineliner Bottle
Miscellaneous Stencils
Gel Press Prints
Black Faber-Castell Pitt Pen
White Sakura Gellyroll Pen
Black Charcoal Pencil
Black Oil Pastel


Have a great Monday and a wonderful week.

PEACE!!

Cyndi

Friday, July 29, 2016

Gel Press® and ETI Earrings and More Blog Hop

Welcome to the ETI/Gel Press® Blog Hop.  The designers for both companies have been creating wonderful projects.  Please leave a comment on the Gel Press® blog and on the Resin Crafts blog as to which projects you found most interesting or inspiring.  One winner will be picked, at random, Sunday, July 31, 2016, at 10pm CST.  The winner will get both Petite sets of Gel Press® plates and ETI Jewelry Resin!  Hop now through Sunday! Winner must be 18 or over and live in the USA.  Good Luck!


Gel Press Petites and ETI Resin


I love making jewelry!  I've made a lot of pieces using my Gel Press® prints.

Earrings with Tiny Gems


Gel Press Jewelry


Supplies

Gel Press® prints - I chose similar colors, yet one is lighter.
Square earrings bezels
Tiny gems
Tweezer to pick up gems
Glue

Instructions

1.  Cut two squares to fit earrings

2.  Cut two smaller accent pieces for centers

3.  Dab a bit of glue in center of earring bezel and attach the square Gel Press® prints

4.  Brush a tiny bit of glue on back of accent print and attach to center of each earring

5.  Using tweezers to pick up each gem, dip in a bit of glue then attach to earrings, as desired.

6.  Give the glue 15 minutes to completely dry

7.  Squeeze Resin into cup up to the first line

8.  Squeeze Hardener into the same cup up to the second line

9.  Using the stick that comes in the ETI package, stir mixture thoroughly for 2 minutes, scraping the edges of the cup.  Then pour the mixture into the second cup and stir again.

10. Pour mixture into each earring up to the top.  Be very careful not to create bubbles.  If you do have a few bubbles, pop them immediately.  

11. Set your project aside and allow to completely harden. (at least 24, preferably 48 hours)

ETI looks cloudy when first poured, but it dries crystal clear and very, very hard.  That's what makes it great for jewelry.  However, do not let any of the mixture dry on your table, etc.  You will not be able to get it off!


Bracelet with Gems and Leather Strap

First, I made a Gel Press® print, using pink and purple paint.


Cut the paper to fit the bezel, and stamped the word "HOPE"


Attached the print to the bezel with a little glue. 


I added two tiny gems, filled the bezel with the ETI, using the instructions, above.

Added leather and....voila.....a cute little bracelet!!


Square Ring

I used the same process, except that I glued a black bead to the center of the Gel Press® print, then poured the ETI.


Earrings 
with a little stamping on the Gel Press® prints.


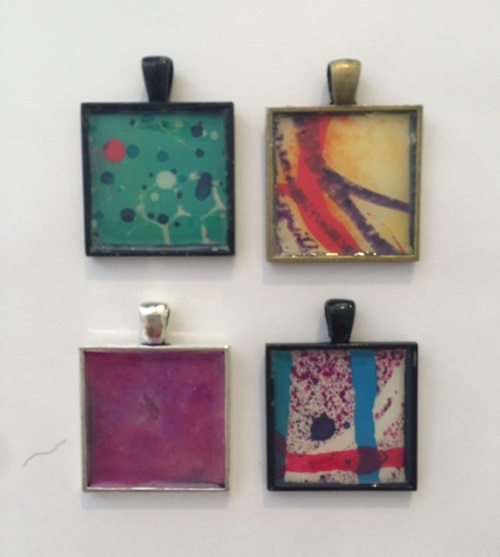
Pendants


And... another ring
this time cutting my prints into thin pieces and gluing them down to create a layered effect.


Watch out....this can become addictive.  I still have more ETI left!!

Now keeping hopping to see more great Gel Press® and ETI projects!


Visit us on Facebook - Gel Press® JunkiesPinterestYouTubeGel Press® Blog

PEACE!!

Cyndi Cesare
Gel Press® Creative Design Team


...



Monday, July 25, 2016

Creative Heart Monday - Lindy's Stamp Gang and Gel Press Print Goldfish

I've never tried the Lindy's Stamp Gang Starburst Sprays before......but now I love them.  They are so shiny and glimmery.

My husband and I, recently, built a goldfish pond in our backyard.  After spraying the Lindy's on my wooden panel, it looked like water, so I, immediately, thought......goldfish.

I've started a new thing.  As you may know, my videos are short and sweet.  However, I've decided to put up "real time" videos, as well as my regular high speed videos, for those that would like to see the project at a little slower pace.  You can find the link to the "real time" video below the regular video.

Here we go.................


Have a great Monday and a wonderful week.

PEACE!!

Cyndi

Monday, July 18, 2016

Creative Heart Monday - Graphite Powder, India Ink, Yupo Paper - Paint it Black


Happy Creative Heart Monday!!


This week is really different.  I saw a video about Graphite powder, graphite crayons, and India Ink.  I wanted to try it....so that's what I did in this video.  It's very abstract.

I tried out the graphite powder and crayons on regular Bristol paper, then tried out the India Ink and alcohol on Yupo paper.  I, definitely, want to work with this again....but this is what I came up with on my first try.........


Here's a link to the video that inspired me to try this.  https://youtu.be/5Enc51QwMSU

Have a great Monday and a wonderful week.

PEACE!!

Cyndi

Wednesday, July 13, 2016

How to Make Faux Washi Tape on the Gel Press Plate.

I think that I have mentioned before, that I have the daughter of a friend doing art with me now on Tuesdays and Thursdays.  Alicia is 10 years old.  I was, actually, her nanny when she was two.  I didn't see them for several years, but we got back together a couple months ago.....and, wouldn't you know it.....Alicia loves art.  So we have been having lots of fun,

Here is our video from yesterday.  We watched Pink Poodle Crafts and Nina Ribena's videos on making washi tape, so we had to try it out for ourselves.

Here we go..................


PEACE!!

Cyndi

Monday, July 11, 2016

Creative Heart Monday - Tiny Dancer


Happy Creative Heart Monday!!

Today, I'm creating piece that is very similar to a larger piece that I did several months ago.  You may have seen the similar piece at the beginning and end of a few videos.  I wanted to do another one.....and I plan to do a series of these dancers (in different poses, of course).

Here we go........


List of Supplies

8" X 8" cradled wooden panel
Gel Press prints
Decoupage
Faber-Castell Big Brush Marker - Dark Grey
DecoArt Media - Paynes Grey, Titan Buff, Cerulean Blue, Cobalt Teal Hue
Americana Acrylics - Neon Pink
Golden - Quinacridone Magenta
Liquitex Gesso - White
Faber-Castell Pitt Pen - Black
Sakura Gellyroll Pen - White
Black Charcoal Pencil


Here's another that I did a couple months ago.

Check out my Facebook Group - Mixed Media Passion.  I would love for you to share your art, or just enjoy the art of others.

Have a great Monday and a wonderful week!

PEACE!

Cyndi