Sunday, March 20, 2016

And The Winner Is......

We have a winner!  We reached 1016 (actually, 1019) views on my "Circles" video last night.  This is my first video to have over 1000 views!

Here's how I chose the winner.....

Everyone's name was written on a strip of paper and folded into an origami bird (not really, but that would have been cute).


Then, I tossed them around for a while.


Then I picked one.  You can tell that it's me because I have paint on my hands and my nails look like crap.


And......the winner is......Jane Wetzel!  (insert applause)  Congratulations Jane (please send your mailing address to ceeceestudio@yahoo.com and I will send the "Circles" to you.

Now wasn't that fun??

Again, thank you all so much for helping me over this 1000 view mark.

I will be having another giveaway in a few weeks.  I'm not allowed to tell you what it is, but it's going to be, really, good.

Have a great Sunday!!

PEACE!

Cyndi

Thursday, March 17, 2016

My First Give-A-Way!!!!!

I've really started building a following since the beginning of the year.  I started making videos on a regular basis, and it has enabled me to meet so many nice people online, and receive some wonderful feedback.

I'm really excited because I have almost reached 1000 views on one of my videos.  (I know that's not a lot in Justin Beiber/BeyoncĂ© land, but it's a lot for me).


The subscribers to my blog and "Creative Heart Monday" have increased and I would like to say "thank you".  So.....here's the deal....check out my "Circle" video and share it with someone (or several someones)...then, comment below.  Everyone that comments will be entered in a drawing.  The drawing will be held within 24 hours of the video reaching 1016 views. 

What will you win??????  The "Circle" mixed-media piece, of course.  I will contact the winner for your mailing address.

I'm not advertising this giveaway on Facebook or any other social media.  I'm just putting this out to my subscribers.  If you share this with someone, and they subscribe to my blog (before we reach 1016 views, I will enter them too!  We are at 973 views......so we don't have much further to go.

Thank you and good luck!!

PEACE!

Cyndi

Tuesday, March 15, 2016

Gel Press™ Jewelry!!


I'm always looking for something else to do with my Gel Press™ plate.  Today, I worked on some quick prints for jewelry.  I went through a jewelry-making phase about 4 years.  I spent a lot of time at the bead store.  Then, I gave it up and gave most of my jewelry-making supplies to my sister.  But, today I felt urge!!

I started out by making two Gel Press™ prints on my 5" X 7" plate.  It only takes a little bit of paper and I'm going to cut it up into tiny pieces, so the prints are very random.


 Jewelry parts from the craft store - earrings and a pendant.


 Miscellaneous stencils and stamps.

Get your Gel Press™ Plate and brayer ready!

A couple small dabs of light purple and magenta (the colors in the photo aren't very accurate)


 Spread the paint out with the brayer.


I used sheet music for the gel prints.  Just place the paper on top of the painted plate, rub, rub, rub, and lift!!


Then a little off white and light blue on the plate.


 Brayer it out, then I used a foam stamp to pull some of the paint off.


Then, put the purple/magenta print back on the plate and pulled the second layer.


 Now for the base of the second print........................

A dab of blue and citron green paint.


 Brayer it out.


 Pull the gel print!


A little orange and pink back on the plate.

Brayer it out.


Added a couple stencils on top of the paint.

and, pulled the print on top of the blue/green gel print.


So, now I have these two Gel Press™ prints!


Next, I started stamping and doodling, randomly, on both prints until I felt that there were some interesting areas.  Remember, we are going to cut out little pieces for the jewelry.


To finish, I just cut out some areas that I liked, using the jewelry pieces as a template.  I used regular glue to adhere the gel print pieces to the jewelry.

For the earrings, I waited a while for the glue to dry, then covered them with the clear, adhesive pieces that came with the earring pieces.  I added my own earring wires (they were not included in the package).


(this pair needs some wires)


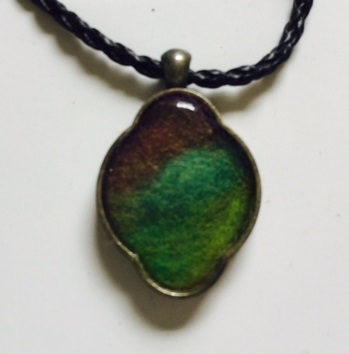
For the pendant, I added "Live Simply" with rub-ons before I cut it out.  Then, after waiting for the glue to dry, I covered the paper with Inkssentials Glossy Accents.  This pendant did not come with it's own cover.  the Glossy Accents provides a nice, shiny finish and seals the paper.  I'll probably hang this piece on a cord.


That's it!!!  It looks like a lot of steps, but it's really easy and the possibilites are endless.  Here are some pix of other pieces that I've made.


PEACE!!

Cyndi

Check out my YouTube Channel for lots of art and how-to videos!!



Monday, March 14, 2016

Creative Heart Monday - Catch The Wind


Happy Creative Heart Monday!!

I've been making a lot of prints on my Gel Press plate, so this is a very colorful piece.  I've also seen quite a few wings, birds, and butterflies, recently....so, I figured I would get in on this.


List of Supplies

8" X 8" wooden panel
Scrap pieces of Gel Press prints
White Liquitex Gesso
Master's Touch Acrylic - Olive Green, Light Purple (I labeled these paints incorrectly on video, oops)
Liquitex Matte Gel (for attaching the butterfly)
Decou-Page
Pigma Micron Pen - Black
Sakura Gellyroll Pen - White
Tim Holtz Rub-Ons
Black Charcoal pencil
Book pages
Ranger Archival Ink - Black
Alphabet Stamps

Note:  In case it wasn't clear in the video.  To make the butterfly, I printed a picture from the computer onto a piece of cardstock.  I covered the back of the cardstock with the prints, then cut it out from the other side.

I was, originally, going to use the words "Fly Away" on this piece.  Then, while I was making it I heard, Donovan's song "Catch the Wind" playing during the credits of a TV show.  I thought "how perfect!"  It just goes to show that you never know where inspiration will pop up.

Have a great Monday and a wonderful week!

PEACE!!

Cyndi

Wednesday, March 9, 2016

Gel Press Prints - Fields of Gold

Here's my new "Just Gellin" video!!

I did a collage landscape.  Last night I heard Sting's Fields of Gold and, immediately thought....get out the Gel Press plate and make some gold-ish gel prints.  I used some metallic paint, along with my regular acrylic paints.


List of Supplies

6" round Gel Press Printing Plate
11" X 14" Strathmore Bristol paper
Golden Fluid Acrylics - Quinacridone Nickel Azo Gold, Burnt Sienna, Nickel Azo Yellow, Quinacridone Magenta
Liquitex Basics - Gold
American Paint - Warm White, Bleached Sand, Raw Umber
FolkArt Metallic - Antique Copper
Bella Glitter Paint - Gold Rush
Liquitex Matte Medium
Brayer
Various handmade and purchased stencils, as well as, markmaking combs

Printing can be so addictive and it's very easy to end up with lots and lots of prints.  They can be used in so many different ways.  Check out Gel Press Junkies for some ideas.


.......and, remember to subscribe to my weekly videos - Creative Heart Monday!!

PEACE!!

Cyndi

Monday, March 7, 2016

Creative Heart Monday - Three Wacky Flowers


Happy Monday to all of you Creative Hearts!!

This week I'm trying out a new supply....Daler Rowney FW Acrylic Artist Inks!  They are just so bright and pretty that I had to try them.

I started out on an 11" X 14" piece of Strathmore Bristol Paper.  I love this paper.....but I'm also have a canvas shortage.  I have to get some canvases this week, or I will end up painting on the walls.

Here's my video!


While I was applying this ink to the paper, I was thinking of a million other ways to use this product.  I can't wait to play around with it some more.


I took an online course last week by Jodi Ohl.  It was great!  Maybe next week I will show you what I've learned.

Thank you for watching!  If you are not already a subscriber.....SUBSCRIBE to Creative Heart Monday.

PEACE!!

Cyndi

Wednesday, March 2, 2016

Just Gellin' Gel Print Circle Art


This is my first "Just Gellin" post.  Since, I am on the Gel Press Creative Team, I will be, periodically, posting videos and tutorials using prints, created on my Gel Press Printing Plate.  I like to name everything, so these will be called "Just Gellin'".

Here's a quickie that I did today.  I used prints that I, previously, made on a Gel Press How-To Video. Please check out the Gel Press Blog to see Lea Cioci's (a fellow designer) piece "Spread Your Wings and Fly".  The Gel Press blog is new....subscribe to it....to see lot's of great art by some super talanted people!!!!!


List of Supplies:

Strathmore Bristol paper
Gel Prints
Decou-Page by DecoArt
Liquitex White Gesso
Liquitex Basics Light Blue Permanent
Golden Fluid Acrylics - Green Gold
Black Charcoal Pencil


I hope that you enjoy the video!!

PEACE!!

Cyndi