Showing posts with label how to. Show all posts

Friday, July 29, 2016

Gel Press® and ETI Earrings and More Blog Hop

Welcome to the ETI/Gel Press® Blog Hop.  The designers for both companies have been creating wonderful projects.  Please leave a comment on the Gel Press® blog and on the Resin Crafts blog as to which projects you found most interesting or inspiring.  One winner will be picked, at random, Sunday, July 31, 2016, at 10pm CST.  The winner will get both Petite sets of Gel Press® plates and ETI Jewelry Resin!  Hop now through Sunday! Winner must be 18 or over and live in the USA.  Good Luck!


Gel Press Petites and ETI Resin


I love making jewelry!  I've made a lot of pieces using my Gel Press® prints.

Earrings with Tiny Gems


Gel Press Jewelry


Supplies

Gel Press® prints - I chose similar colors, yet one is lighter.
Square earrings bezels
Tiny gems
Tweezer to pick up gems
Glue

Instructions

1.  Cut two squares to fit earrings

2.  Cut two smaller accent pieces for centers

3.  Dab a bit of glue in center of earring bezel and attach the square Gel Press® prints

4.  Brush a tiny bit of glue on back of accent print and attach to center of each earring

5.  Using tweezers to pick up each gem, dip in a bit of glue then attach to earrings, as desired.

6.  Give the glue 15 minutes to completely dry

7.  Squeeze Resin into cup up to the first line

8.  Squeeze Hardener into the same cup up to the second line

9.  Using the stick that comes in the ETI package, stir mixture thoroughly for 2 minutes, scraping the edges of the cup.  Then pour the mixture into the second cup and stir again.

10. Pour mixture into each earring up to the top.  Be very careful not to create bubbles.  If you do have a few bubbles, pop them immediately.  

11. Set your project aside and allow to completely harden. (at least 24, preferably 48 hours)

ETI looks cloudy when first poured, but it dries crystal clear and very, very hard.  That's what makes it great for jewelry.  However, do not let any of the mixture dry on your table, etc.  You will not be able to get it off!


Bracelet with Gems and Leather Strap

First, I made a Gel Press® print, using pink and purple paint.


Cut the paper to fit the bezel, and stamped the word "HOPE"


Attached the print to the bezel with a little glue. 


I added two tiny gems, filled the bezel with the ETI, using the instructions, above.

Added leather and....voila.....a cute little bracelet!!


Square Ring

I used the same process, except that I glued a black bead to the center of the Gel Press® print, then poured the ETI.


Earrings 
with a little stamping on the Gel Press® prints.


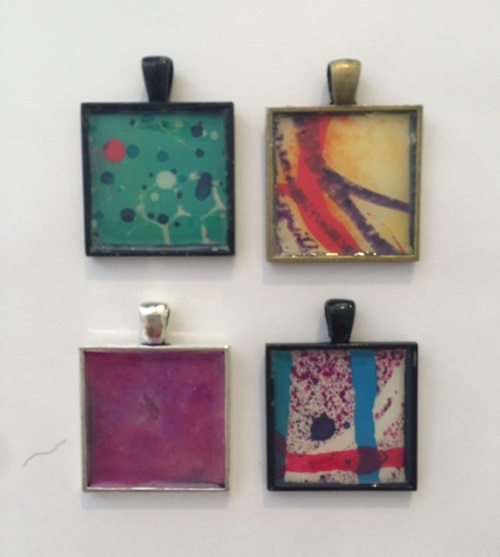
Pendants


And... another ring
this time cutting my prints into thin pieces and gluing them down to create a layered effect.


Watch out....this can become addictive.  I still have more ETI left!!

Now keeping hopping to see more great Gel Press® and ETI projects!


Visit us on Facebook - Gel Press® JunkiesPinterestYouTubeGel Press® Blog

PEACE!!

Cyndi Cesare
Gel Press® Creative Design Team


...


Wednesday, May 25, 2016

How to Make a Rubber Stamp Cube

Here's the second video in my "Tips and Techniques" series.

This is a super, simple way to make six rubber stamps of your own design.

I love to use rubber stamps to add texture to my paintings, make imprints in Gel Press™ prints, background paper for cards, etc.  You can use this rubber stamp block with ink or paint.

Here we go........


I hope that you are having a wonderful day!

PEACE!!

Cyndi

FYI - Be on the lookout for my Father's Day post, this Friday 5/27 and a new project on the Gel Press Blog on 6/3!!

Monday, May 9, 2016

How to make collage / tissue paper

I use a lot of different paper to start out my art projects.  A lot of times, I will cover a canvas with book pages, gel prints, etc. to start a background.  I love the Tim Holtz tissue paper for this purpose. However, I'm out of it and they didn't have any at the craft store......so I decided to make some to have on hand.  It' super easy!

In the past, I have used artist tissue paper, deli paper, and tracing paper.  They all work great.  Today, the only thing that I had available was tracing paper.....so that's what I used.  Since I was making it anyway, I thought I would do a little video, in case, anyone would like to see the process.

Here we go.......


You can do this on regular tissue paper, but "artist tissue paper" works a little better.  And....if you do it on big tissue paper sheets, you can use it for wrapping gifts, stuffing gift bags, etc.  I, generally, just rip pieces off and use it as collage paper on my art projects.  When applied to the project with gel medium, the paper becomes, somewhat, transparent and just the stamping shows.  I also use this same process for adding words to canvases.  I have a fear of stamping directly onto a canvas that I've worked on for hours......the letters never go on straight....or, they don't end up looking quirky if that's what I want.  So I stamp onto the tracing paper or tissue paper (getting it the way I want it) then apply it to the project with gel medium.

Hope you're week is off to a good start.

PEACE!!

Cyndi

Monday, April 25, 2016

Creative Heart Monday - Black Eyed Susans and Phlox


Happy Creative Heart Monday!!


My husband picked some wildflowers on the side of the road.  The colors were so beautiful.  I wanted to try to paint them.  As you know, I usually do not just use paint.....but, I gave it a shot!!


List of Supplies

8" X 8" wooden panel
White Liquitex Gesso
Liquitex Basics - Cadmium Orange, Red, Cadmium Yellow
Masters Touch - Light Purple Hue
Golden Fluid Acrylics - Quinacridone Magenta, Green Gold
Golden Glass Bead Gel
Black Faber-Castell Pen
White Gellyroll pen

At the end, I still wasn't happy with the painting, so I outlined all of the flowers, very loosely, with a black pen.....and, added a few highlights with a white pen.


Have a wonderful Monday and a great week!

PEACE!!

Cyndi